
Sure, here’s a simple introduction for your blog article on Samsung dryer belt replacement:
Are you experiencing issues with your Samsung dryer? The dryer belt plays a crucial role in the functioning of your appliance. In this guide, we will walk you through the step-by-step process of replacing the Samsung dryer belt to get your dryer up and running again in no time.
How to Replace the Samsung Dryer Belt: A Step-by-Step Guide
How to Replace the Samsung Dryer Belt: A Step-by-Step Guide
If you own a Samsung dryer and notice that it’s not spinning or tumbling properly, there’s a good chance that the belt is broken or worn out. Fortunately, replacing the dryer belt is a relatively simple task that you can do yourself. Here’s a step-by-step guide to help you with the process:
Step 1: Unplug the dryer from the power source to ensure your safety.
Step 2: Locate the top or front panel, depending on your specific model. For most Samsung dryers, you’ll need to remove the top panel by removing the screws at the back of the dryer.
Step 3: Once the panel is removed, locate the belt and drum. Inspect the belt for any signs of damage or wear. If it’s broken or worn out, you’ll need to replace it.
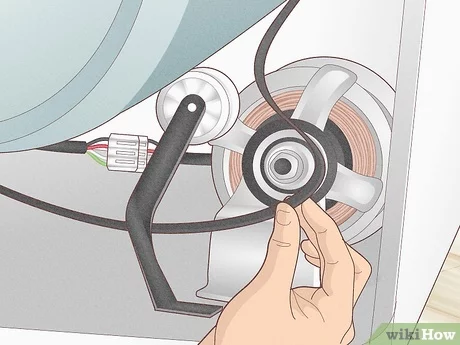
Step 4: To remove the old belt, release the tension by pushing the idler pulley arm towards the motor. This will loosen the belt and allow you to remove it from the motor and idler pulley.
Step 5: Take the new belt and loop it around the drum, ensuring that it’s positioned correctly on the groove. Make sure the ribs of the belt are facing the drum.
Step 6: Reattach the belt to the motor and idler pulley by releasing the tension on the idler pulley arm again. Make sure the belt is securely attached and properly aligned on the motor and pulley.
Step 7: Before reassembling the dryer, check the belt tension. It should feel taut but not too tight. Adjust the tension if necessary by moving the idler pulley arm.
Step 8: Once you’re satisfied with the belt tension, replace the top panel by securing it with screws. Make sure all the screws are tightened properly.
Step 9: Plug the dryer back into the power source and test it to ensure the new belt is functioning correctly. Listen for any unusual noises or vibrations.
By following these steps, you can easily replace the Samsung dryer belt and restore your dryer’s functionality. Remember to always prioritize safety by unplugging the appliance before performing any repairs or maintenance.
Frequent Questions
How often do I need to replace the belt on my Samsung dryer?
The belt on a Samsung dryer typically needs to be replaced every 5-7 years or when it shows signs of wear and tear.
What are the signs that indicate the belt on my Samsung dryer needs replacement?
The signs that indicate the belt on your Samsung dryer needs replacement could include a loud banging noise, the drum not turning, or clothes taking longer to dry.
Is it possible to replace the belt on a Samsung dryer without professional assistance?
Yes, it is possible to replace the belt on a Samsung dryer without professional assistance. There are numerous online tutorials and step-by-step guides available that provide instructions on how to replace the belt. Additionally, many replacement parts and belts can be easily purchased online. With some basic tools and the right instructions, you can successfully replace the belt on your Samsung dryer.
In conclusion, Samsung dryer belt replacement is an essential aspect of maintaining optimal performance for your appliance. As technology continues to advance, it becomes increasingly important to stay informed about the inner workings of our devices. By understanding how to replace the dryer belt in your Samsung dryer, you can extend its lifespan and avoid costly repairs. Remember to always consult your user manual and follow safety precautions when working with electrical appliances. With the right knowledge and tools, you can confidently tackle this task and keep your Samsung dryer running smoothly for years to come.

